Here’s how you can get WireGuard with DNSCrypt set up on your server.

In today’s world, VPNs aren’t a must to keep your personal data safe online, unless you’re on holiday in a hotel or café with a bunch of open Wi-Fi networks, which you probably shouldn’t connect to anyway without using encryption to protect your data. Even so, protecting my privacy is my top priority, wherever I am and whatever I’m doing. That’s why I always use a VPN as an extra layer of protection, and it’s always switched on on my computer and phone.
I would say that WireGuard is one of the best VPN technologies out there at the moment. It’s modern, lightweight, and highly effective. It’s built for speed and security, with strong encryption that doesn’t drain your battery or consume excessive system resources. Another plus is that it’s an open-source solution, which is exactly what we’re looking for.
However, a VPN alone isn’t enough to fully secure your connection. If your DNS queries aren’t encrypted, they can be intercepted and monitored, undermining your privacy. That’s why it’s vital to use encrypted DNS protocols like DNS over HTTPS (DoH) or DNS over TLS (DoT). These protocols ensure your DNS queries remain private and protected from tampering or snooping.
Basically, if you combine a reliable VPN like WireGuard with encrypted DNS, you’ll have strong protection for your internet access. In this article, I’ll give you a quick tutorial on how to install WireGuard on a server and DNSCrypt to encrypt DNS protocols through DoH.
Let’s dive into the installation and configuration of WireGuard and DNSCrypt.
Steps for installing WireGuard and DNSCrypt on a server running Debian or Ubuntu#
First, we need to update your server. It’s a good idea to do this regularly to keep things secure and stable.
sudo apt update
sudo apt list --upgradable
sudo apt upgrade
Next, install WireGuard and DNSCrypt (and UFW if you haven’t already).
sudo apt install wireguard dnscrypt-proxy ufw
Configuring WireGuard#
WireGuard uses a system called Cryptokey Routing to manage VPN tunnels. In simple terms, it checks public keys that are linked to specific IP addresses to securely route traffic through the VPN.
To set up WireGuard properly, you’ll need a private key and a public key—these keys are essential for creating and connecting to your VPN interface.
Let’s walk through how to create a new WireGuard interface and generate the necessary key pair on your server.
Step 1: Generate the Private Key#
Run the following command to generate a new WireGuard private key and save it to /etc/wireguard/server_private.key:
sudo wg genkey | sudo tee /etc/wireguard/server_private.key
After running the command, you’ll see your newly generated private key, which will look something like this:
8MWigFiRt1F3/2ytArJ/mI9EZ7oSRE87dHpLP62E3mQ=
Important: Make sure to copy and securely store this key. You’ll need it later, and you should never share your private key with anyone.
Step 2: Set Secure Permissions for the Private Key#
To keep your private key safe, it’s important to restrict access so that only the root user can read it. You can do this by changing the file permissions to 600:
sudo chmod 600 /etc/wireguard/server_private.key
Why this matters: Setting the correct permissions ensures that no other users on the system can view or modify your private key.
Step 3: Generate the Public Key#
Now, let’s create the public key that matches your private key. Run the following command to generate it and save it to /etc/wireguard/server_public.key:
sudo cat /etc/wireguard/server_private.key | wg pubkey | sudo tee /etc/wireguard/server_public.key
Once the command runs, you’ll see your public key displayed, which will look something like this:
0G5VzvG9RRnFjeWGJDt0ld4iu2G9EAYMYs6WrIqrFzA=
Tip: This public key can safely be shared with peers you want to connect to. It’s used to identify your server in the VPN tunnel, but it doesn’t compromise your security.
Step 4: Check Your Server’s Network Interface#
Before setting up WireGuard, you’ll need to know the name of your server’s main network interface and its public IP address. Run the following command to list all available network interfaces:
ip a
Look for the primary interface in the output. It will look something like this:
1: lo: <LOOPBACK,UP,LOWER_UP> mtu 65536 qdisc noqueue state UNKNOWN group default qlen 1000
    link/loopback 00:00:00:00:00:00 brd 00:00:00:00:00:00
    inet 127.0.0.1/8 scope host lo
       valid_lft forever preferred_lft forever
    inet6 ::1/128 scope host noprefixroute
       valid_lft forever preferred_lft forever
2: eth0: <BROADCAST,MULTICAST,UP,LOWER_UP> mtu 1500 qdisc mq state UP group default qlen 1000
    link/ether aa:bb:cc:dd:ee:ff brd ff:ff:ff:ff:ff:ff
    altname enp5s0
    inet 203.0.113.10/32 scope global eth0
       valid_lft forever preferred_lft forever
    inet6 2001:db8::/64 scope global
       valid_lft forever preferred_lft forever
    inet6 fe80::aabb:ccff:fedd:eeff/64 scope link
       valid_lft forever preferred_lft forever
4: wg0: <POINTOPOINT,NOARP,UP,LOWER_UP> mtu 1420 qdisc noqueue state UNKNOWN group default qlen 1000
    link/none
    inet 10.8.0.1/24 scope global wg0
       valid_lft forever preferred_lft forever
In this example:
- The main public network interface is
eth0. - The public IP address is
203.0.113.10.
Tip: WireGuard will use your main network interface to forward traffic to the internet. Make sure to use the correct interface name for your server in the next steps.
Step 5: Create the WireGuard Configuration File#
Next, you’ll create the WireGuard configuration file using a text editor like Nano:
sudo nano /etc/wireguard/wg0.conf
Add the following configuration to the file. Remember to:
- Replace
8MWigFiRt1F3/2ytArJ/mI9EZ7oSRE87dHpLP62E3mQ=with the private key you generated earlier. - Replace
eth0with your main network interface name if it’s different.
[Interface]
Address = 10.8.0.1/24
MTU = 1420
SaveConfig = true
PostUp = ufw route allow in on wg0 out on eth0
PostUp = iptables -t nat -I POSTROUTING -o eth0 -j MASQUERADE
PreDown = ufw route delete allow in on wg0 out on eth0
PreDown = iptables -t nat -D POSTROUTING -o eth0 -j MASQUERADE
ListenPort = 51820
PrivateKey = 8MWigFiRt1F3/2ytArJ/mI9EZ7oSRE87dHpLP62E3mQ=    # Replace with your server private key
When you’re done, save and close the file.
The wg0.conf file is the main configuration file for your WireGuard VPN interface. It tells WireGuard how to set up and manage the VPN tunnel on your server. Each part of the file plays a specific role.
| Setting | Purpose |
|---|---|
[Interface] |
Starts interface configuration |
Address |
Server’s internal VPN IP |
MTU |
Maximum packet size |
SaveConfig |
Auto-save changes |
PostUp/PreDown |
Firewall and NAT setup/cleanup |
ListenPort |
Port for VPN connections |
PrivateKey |
Server’s unique VPN identity key |
Here’s what each part does:
[Interface]#
This section defines the local WireGuard VPN interface (in this case, wg0).
All the settings underneath apply to this server’s VPN endpoint.
Address = 10.8.0.1/24#
This is the internal VPN IP address assigned to the server.
10.8.0.1is like the “gateway” for VPN clients./24means the VPN network supports addresses from10.8.0.1to10.8.0.254.
MTU = 1420#
MTU stands for Maximum Transmission Unit.
- It defines the largest packet size that can pass through the VPN tunnel.
1420is a commonly recommended size for WireGuard to prevent packet fragmentation.
SaveConfig = true#
When this is set to true, WireGuard will automatically save any changes made to the configuration at runtime.
Optional: If you prefer to manage the configuration manually, you can set this to false.
PostUp and PreDown commands#
These run automatically when the VPN starts (PostUp) or stops (PreDown).
PostUp commands:#
-
ufw route allow in on wg0 out on eth0This allows traffic from the VPN (wg0) to pass through the server’s main network interface (eth0). -
iptables -t nat -I POSTROUTING -o eth0 -j MASQUERADEThis sets up NAT (Network Address Translation), which is required to route VPN traffic to the internet using the server’s public IP.
PreDown commands:#
These reverse the PostUp settings when the VPN stops:
-
ufw route delete allow in on wg0 out on eth0This removes the VPN routing rule. -
iptables -t nat -D POSTROUTING -o eth0 -j MASQUERADEThis deletes the NAT rule to clean up.
ListenPort = 51820#
This is the UDP port WireGuard will listen on for incoming VPN connections.
51820is WireGuard’s default port, but you can change it if needed.
PrivateKey = 8MWigFiRt1F3/2ytArJ/mI9EZ7oSRE87dHpLP62E3mQ=#
This is the server’s private key.
- It authenticates and encrypts traffic for the VPN.
- Important: Keep this private! Never share it.
Generate WireGuard Client Configurations#
For each WireGuard client (like your phone, laptop, or another server) to connect to your VPN, it needs a unique key pair. You’ll also need to add each client’s public key to your server’s configuration to allow them to connect.
Follow these steps to create a new WireGuard client configuration and enable secure VPN tunnels.
Step 1: Generate the Client Private Key#
Let’s start by creating a new private key for your client. This key will be used to authenticate the client in your VPN network.
sudo wg genkey | sudo tee /etc/wireguard/client1_private.key
Tip:
You can replace client1 with any name you like (for example, laptop, phone, or workpc) to help you keep track of your devices.
Step 2: Generate the Client Public Key#
Now, create the public key for your client based on the private key you just generated:
sudo cat /etc/wireguard/client1_private.key | wg pubkey | sudo tee /etc/wireguard/client1_public.key
What this does: The public key is safe to share and will be added to your server’s WireGuard configuration to authorize this client.
Step 3: View the Client Private Key#
To set up the client device later, you’ll need to copy its private key. Run the following command to display it:
sudo cat /etc/wireguard/client1_private.key
Example output:
UHkIk3+cj6Lo3Jc21jHkCI6/90MHBDCALHsGz92BsVA=
Important: This private key should only be stored on the client device. Never share it publicly, as it’s used to secure the connection.
Step 4: View the Client Public Key#
Now, let’s display the client’s public key so we can add it to the server later:
sudo cat /etc/wireguard/client1_public.key
Example output:
S3Em6/sSGfkkeGShQPmJAIXb0hALHHcv1jmjWEBbdAU=
Tip: Copy this public key to your clipboard — you’ll need it soon.
Step 5: Create the Client Configuration File#
Next, we’ll create a WireGuard configuration file for the client.
sudo nano /etc/wireguard/client1.conf
Step 6: Add the Client Configuration Details#
Paste the following example into the client1.conf file.
Make sure to replace:
UHkIk3+cj6Lo3Jc21jHkCI6/90MHBDCALHsGz92BsVA=with your generated client private key0G5VzvG9RRnFjeWGJDt0ld4iu2G9EAYMYs6WrIqrFzA=with your server public key203.0.113.10with your actual server’s public IP address
[Interface]
PrivateKey = UHkIk3+cj6Lo3Jc21jHkCI6/90MHBDCALHsGz92BsVA=   # Client Private Key
Address = 10.8.0.2/24
DNS = 8.8.8.8

[Peer]
PublicKey = 0G5VzvG9RRnFjeWGJDt0ld4iu2G9EAYMYs6WrIqrFzA=    # Server Public Key
AllowedIPs = 0.0.0.0/0
Endpoint = 203.0.113.10:51820                               # Server public IP
PersistentKeepalive = 15
Save and close the file when you’re done.
Configuration Breakdown:#
- PrivateKey: The unique private key for the client.
- Address: The VPN IP address for the client. Each client should have a unique address (e.g.
10.8.0.2for client 1,10.8.0.3for client 2). - DNS: Optional, but here it’s set to Google DNS (
8.8.8.8). Later, we will change it to our own DNSCrypt! - PublicKey: The server’s public key, used to encrypt traffic to the server.
- AllowedIPs:
0.0.0.0/0routes all the client’s internet traffic through the VPN. - Endpoint: The public IP address and port where the WireGuard server is listening.
- PersistentKeepalive: Keeps the connection alive by sending a ping every 15 seconds, especially useful if the client is behind NAT.
Step 7: Move the Client Config for Easy Access#
Let’s copy the client configuration file to your home directory so you can easily transfer it to the client device:
sudo cp /etc/wireguard/client1.conf ~/client1.conf
Note: This prevents permission issues when downloading the file.
Step 8: Add the Client to the Server Configuration#
Now, open your WireGuard server’s configuration file to add the new client’s details.
sudo nano /etc/wireguard/wg0.conf
Step 9: Add the New Client as a Peer#
Scroll to the bottom of the server configuration and add the following section.
Be sure to replace S3Em6/sSGfkkeGShQPmJAIXb0hALHHcv1jmjWEBbdAU= with the public key you generated for the client.
[Peer]
PublicKey = S3Em6/sSGfkkeGShQPmJAIXb0hALHHcv1jmjWEBbdAU=   # Client public key
AllowedIPs = 10.8.0.2/32
Explanation:
- PublicKey: The client’s public key that authorizes them to connect.
- AllowedIPs: Specifies the IP address assigned to this client (in this case,
10.8.0.2). The/32ensures only this address is used by this client.
Save and close the file.
Set Up DNSCrypt-Proxy for DNS over HTTPS (DoH) and DNS Filtering#
Using encrypted DNS is an essential step to protect your online privacy and prevent DNS-based tracking or manipulation. With dnscrypt-proxy, you can encrypt your DNS traffic, use trusted DNS resolvers, and even block specific domains using customizable blacklists.
Step 1: Configure DNSCrypt-Proxy#
Open the DNSCrypt-Proxy configuration file:
sudo nano /etc/dnscrypt-proxy/dnscrypt-proxy.toml
Below is a breakdown of important options you should configure:
# DNSCrypt-Proxy will listen on the VPN server's private WireGuard IP on port 53
listen_addresses = ['10.8.0.1:53']

# Use a secure DNS provider that supports filtering and DoH (this example uses Quad9)
server_names = ['quad9-dnscrypt-ip4-filter-pri']

# Enable DNSCrypt and DoH servers
ipv4_servers = true
ipv6_servers = false
dnscrypt_servers = true
doh_servers = true

# Enable DNS caching for faster lookups
cache = true
cache_size = 4096
cache_min_ttl = 2400
cache_max_ttl = 86400
cache_neg_min_ttl = 60
cache_neg_max_ttl = 600

# Enable DNS query logging
[query_log]
file = '/var/log/dnscrypt-proxy/query.log'
format = 'tsv'

# Log non-existing domain queries (NXDOMAIN)
[nx_log]
file = '/var/log/dnscrypt-proxy/nx.log'
format = 'tsv'

# Quad9 resolver source configuration
[sources.'quad9-resolvers']
urls = ['https://www.quad9.net/quad9-resolvers.md']
minisign_key = 'RWQBphd2+f6eiAqBsvDZEBXBGHQBJfeG6G+wJPPKxCZMoEQYpmoysKUN'
cache_file = 'quad9-resolvers.md'
prefix = 'quad9-'

# Keep the default public resolver list for flexibility
[sources.'public-resolvers']
url = 'https://download.dnscrypt.info/resolvers-list/v2/public-resolvers.md'
cache_file = '/var/cache/dnscrypt-proxy/public-resolvers.md'
minisign_key = 'RWQf6LRCGA9i53mlYecO4IzT51TGPpvWucNSCh1CBM0QTaLn73Y7GFO3'
refresh_delay = 72
prefix = ''
Step 2: Enable Domain Filtering (Blacklist)#
DNSCrypt-Proxy makes it easy to block unwanted domains using a blacklist file. In the configuration file, enable the blacklist:
[blacklist]
blacklist_file = '/etc/dnscrypt-proxy/blacklist.txt'
You can block specific domains by adding them to blacklist.txt:
sudo nano /etc/dnscrypt-proxy/blacklist.txt
Example:
ads.example.com
tracking.example.net
malicious-site.com
Important: The blacklist file only works for domain names. If you want to block IP addresses, you need to use a separate IP block list. DNSCrypt-Proxy does not support mixing domains and IPs in the same blacklist file.
To block IP addresses, create a separate file and configure it in the ip_blacklist section:
[ip_blacklist]
blacklist_file = '/etc/dnscrypt-proxy/ip-blacklist.txt'
Example IP blacklist (ip-blacklist.txt):
203.0.113.10
198.51.100.22
Step 3: Restart DNSCrypt-Proxy#
After saving all changes, restart the DNSCrypt-Proxy service to apply your new configuration:
sudo systemctl restart dnscrypt-proxy
You can verify the service is running properly with:
sudo systemctl status dnscrypt-proxy
Look for Active: active (running) to confirm.
Step 4: Test DNS Resolution#
Try querying a domain using dig or nslookup to verify that your DNS requests are being handled by your DNSCrypt server:
dig @10.8.0.1 example.com
You should see a fast response, and if the domain is blacklisted, you will not receive a valid IP address.
You can also check the log files:
sudo tail -f /var/log/dnscrypt-proxy/query.log
Step 5: Add DNSCrypt-Proxy to Your WireGuard Configuration#
In your WireGuard client configuration, set the DNS to the VPN server’s private WireGuard IP (where DNSCrypt-Proxy is listening).
[Interface]
PrivateKey = UHkIk3+cj6Lo3Jc21jHkCI6/90MHBDCALHsGz92BsVA=
Address = 10.8.0.2/24
DNS = 10.8.0.1 # DNSCrypt-Proxy address

[Peer]
PublicKey = 0G5VzvG9RRnFjeWGJDt0ld4iu2G9EAYMYs6WrIqrFzA=
AllowedIPs = 0.0.0.0/0
Endpoint = 203.0.113.10:51820
PersistentKeepalive = 15
This ensures all DNS traffic from your VPN client will be securely sent to the DNSCrypt-Proxy on the VPN server.
Step 6: Test DNS Resolution Over VPN#
Once your VPN tunnel is active, test DNS resolution through the secure proxy:
dig @10.8.0.1 example.com
This confirms that your VPN clients are successfully using the encrypted DNS resolver provided by your DNSCrypt-Proxy setup.
UFW Configuration for SSH, DNS and WireGuard#
First, see if UFW is installed and running (if it’s inactive, don’t worry—you’ll enable it later):
sudo ufw status verbose
Step 1: Allow Essential Services#
Before enabling UFW, make sure you allow SSH (to avoid locking yourself out):
sudo ufw allow ssh
Go ahead and allow those WireGuard and DNSCrypt ports. WireGuard usually uses UDP port 51820 by default, and DNSCrypt uses port 53:
sudo ufw allow 51820/udp        # WireGuard
sudo ufw allow 53/udp           # DNSCrypt (DNS over UDP)
If your DNSCrypt setup is also handling TCP (some DNS servers support TCP fallback), you may also want to allow TCP port 53:
sudo ufw allow 53/tcp
Step 2: Enable the Firewall#
Activate UFW:
sudo ufw enable
You can check whether the rules are active:
sudo ufw status numbered
Example output:
Status: active

     To                         Action      From
     --                         ------      ----
[ 1] 51820/udp                  ALLOW IN    Anywhere
[ 2] 22/tcp                     ALLOW IN    Anywhere
[ 3] 53/udp                     ALLOW IN    Anywhere
[ 4] Anywhere on eth0           ALLOW FWD   Anywhere on wg0
[ 5] 51820/udp (v6)             ALLOW IN    Anywhere (v6)
[ 6] 22/tcp (v6)                ALLOW IN    Anywhere (v6)
[ 7] 53/udp (v6)                ALLOW IN    Anywhere (v6)
[ 8] Anywhere (v6) on eth0      ALLOW FWD   Anywhere (v6) on wg0
For maximum security, make sure UFW denies all other incoming connections:
sudo ufw default deny incoming
sudo ufw default allow outgoing
This means only ports you specifically allow (like SSH, WireGuard and DnsCrypt) will be open. If you make any changes, just reload the ufw to accept the new rules:
sudo ufw reload
Step 3: Enable IP Forwarding#
Enable IPv4 packet forwarding to allow traffic between your VPN clients and the internet:
echo 'net.ipv4.ip_forward = 1' | sudo tee -a /etc/sysctl.conf
Output:
net.ipv4.ip_forward = 1
Then just reload your sysctl configuration to apply the changes:
sudo sysctl -p
Step 4: Configure NAT#
Enable your main server network interface (in this case, it’s eth0) to translate network requests from the WireGuard VPN subnet 10.8.0.0/24:
sudo iptables -t nat -A POSTROUTING -s 10.8.0.0/24 -o eth0 -j MASQUERADE
Optional but Recommended: Make the iptables Rule Persistent#
The iptables rule will be lost after a reboot unless you save it.
On Ubuntu/Debian, you can install iptables-persistent to save rules across reboots:
sudo apt install iptables-persistent
Save current iptables rules:
sudo netfilter-persistent save
To reload the rules at boot, the service should automatically enable itself:
sudo systemctl enable netfilter-persistent
Connect Your VPN Client to the WireGuard VPN Server#
WireGuard clients connect to your VPN server using configuration files. To connect to your WireGuard VPN server and test the connection using the ping utility, follow these steps.
Step 1: Download the WireGuard Client Configuration#
From your VPN server, securely transfer the client configuration file to your local device using scp.
Run this command in your local terminal (replace wireguard-server-ip with your server’s actual IP address and linuxuser with your server username):
scp linuxuser@wireguard-server-ip:client1.conf .
Step 2: Install WireGuard on Your Device#
Download and install the latest WireGuard VPN application for your device .
Step 3: Import the VPN Tunnel#
-
Open the WireGuard application on your device.
-
Click Add Tunnel or Import tunnel(s) from file to load your client configuration file.
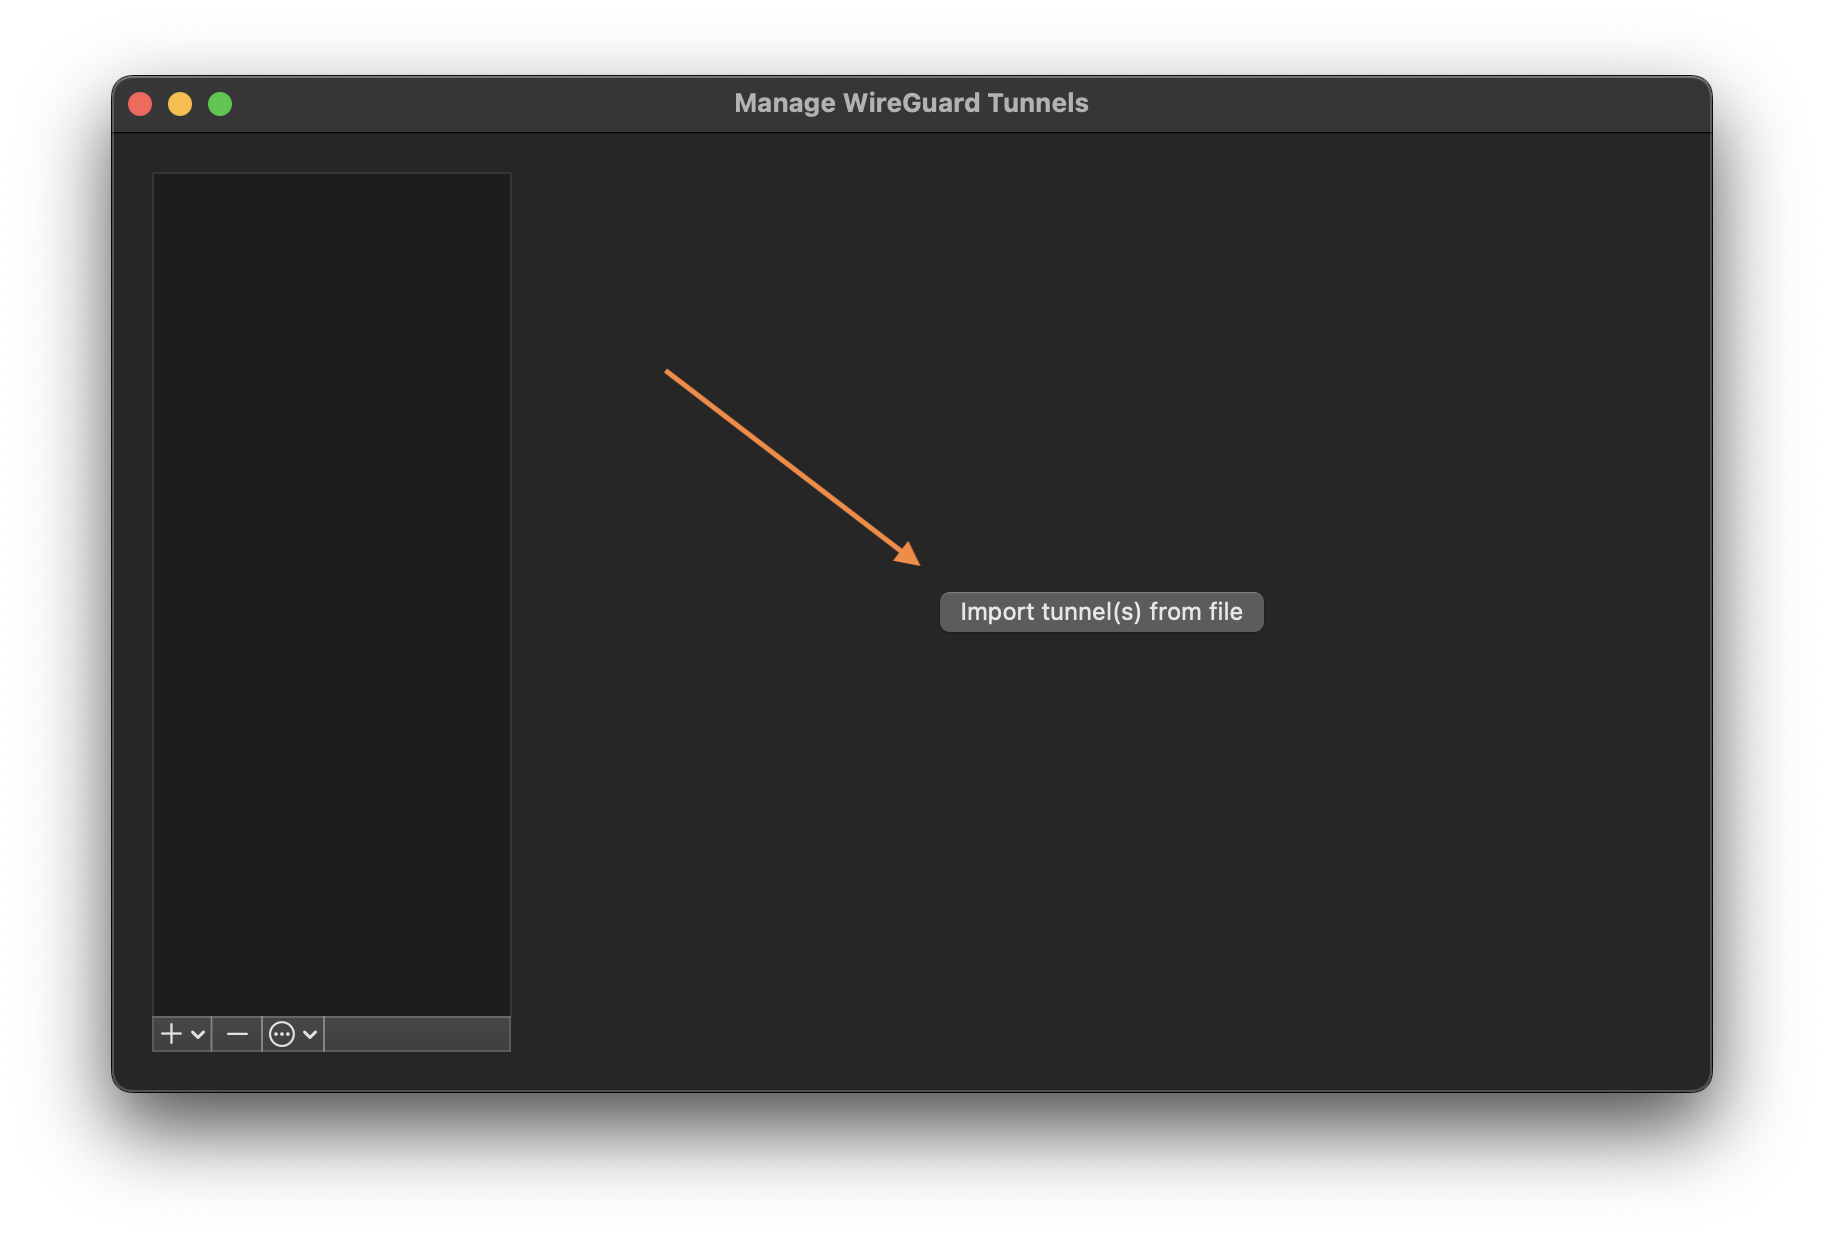
- Browse and open the client configuration file you just downloaded. It should now appear in your tunnel list.
Step 4: Activate the VPN Tunnel#
- Click Activate to connect to your WireGuard VPN server.
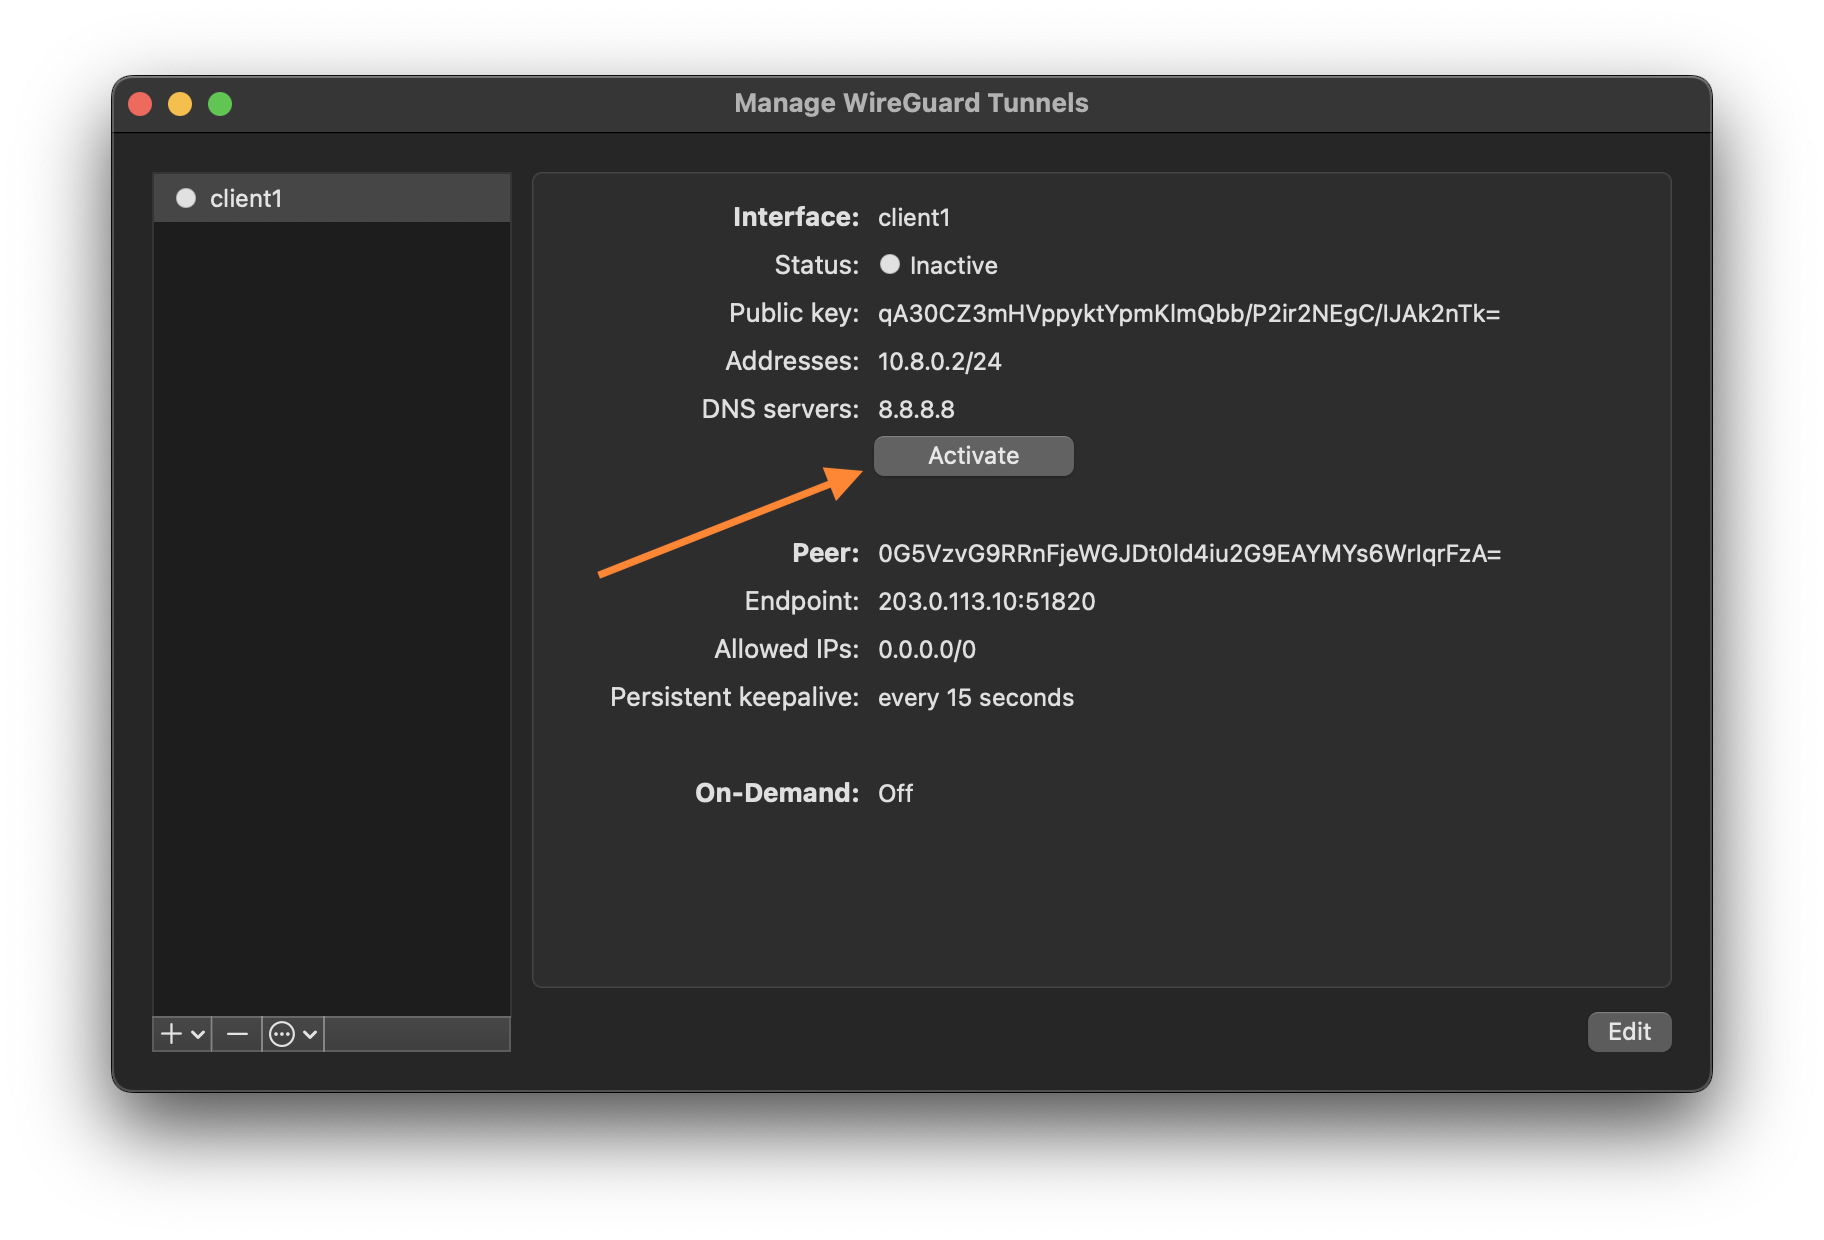
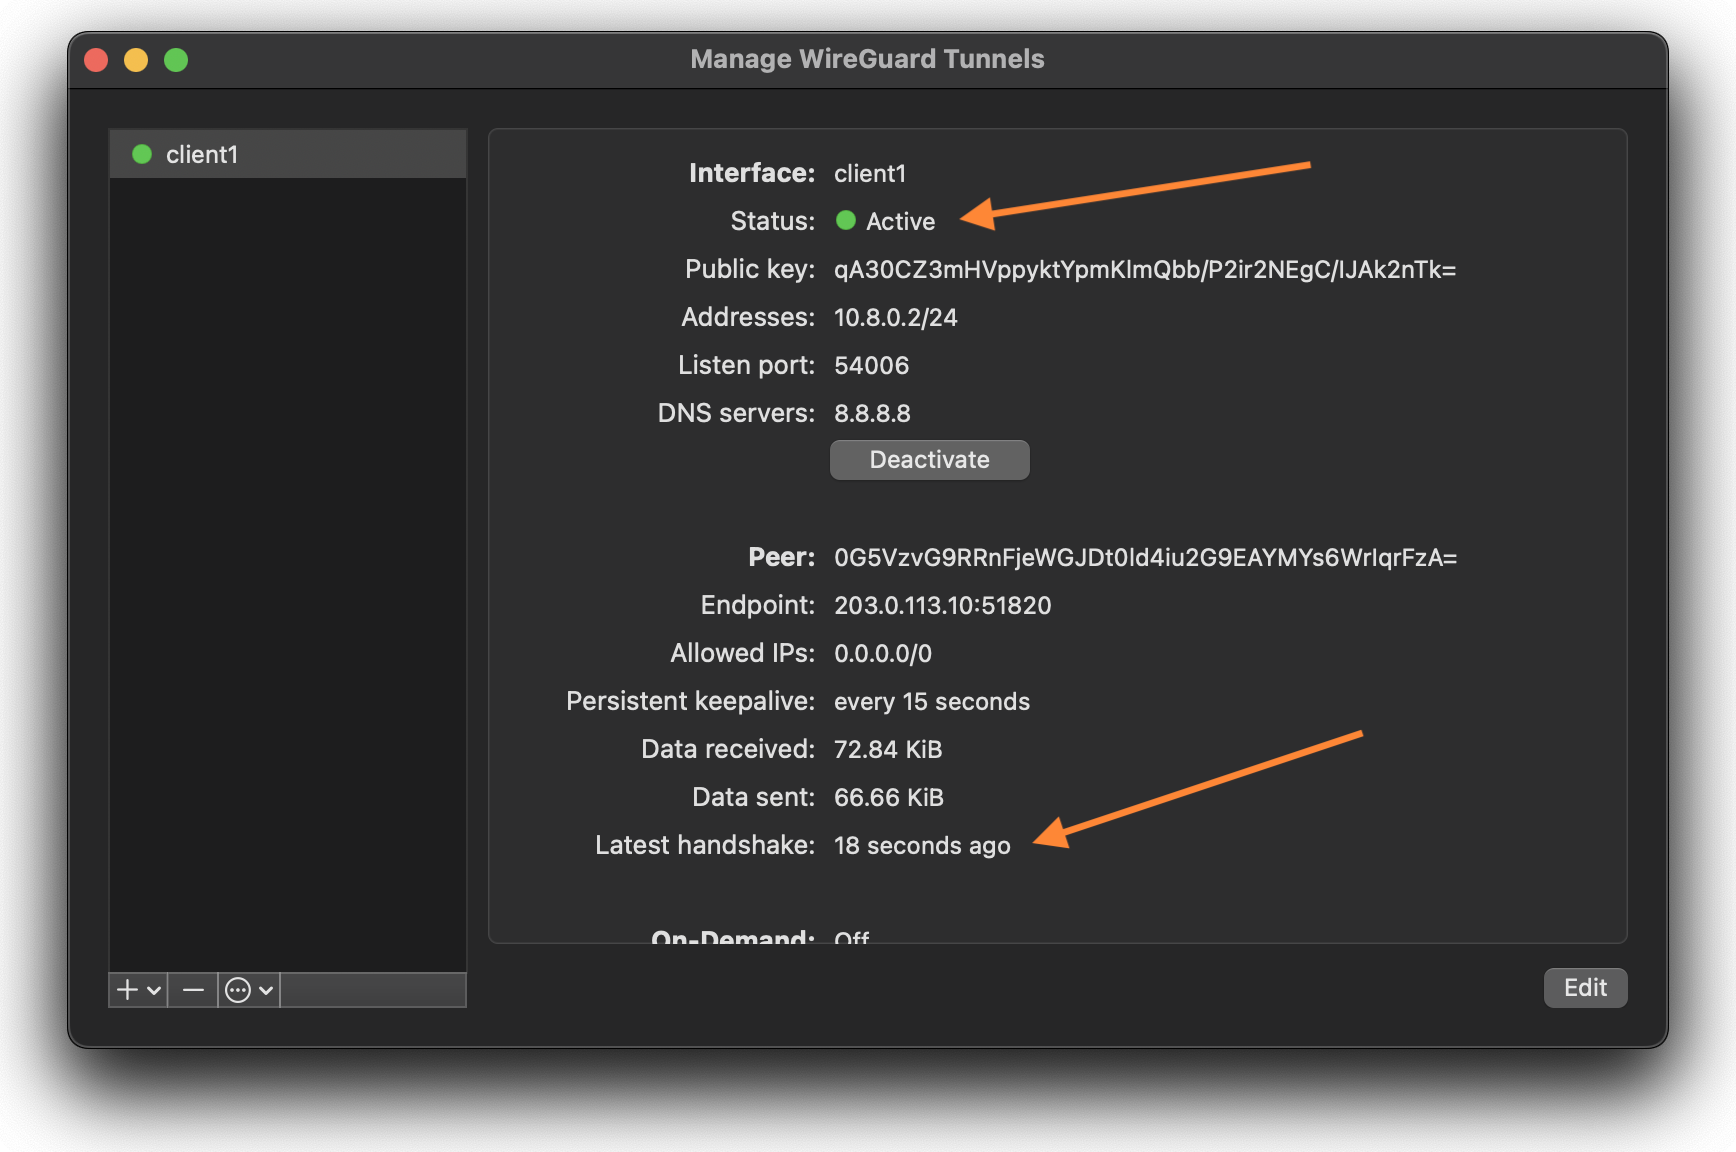
- Verify that your tunnel is connected and review the connection statistics.
Step 5: Test VPN Connectivity#
- Open a terminal window on your device.
- Test connectivity to the WireGuard VPN server’s private IP address (e.g.,
10.8.0.1) using the ping utility:
ping -c 4 10.8.0.1
Example successful output:
PING 10.8.0.1 (10.8.0.1): 56 data bytes
64 bytes from 10.8.0.1: icmp_seq=0 ttl=64 time=31.234 ms
64 bytes from 10.8.0.1: icmp_seq=1 ttl=64 time=31.003 ms
64 bytes from 10.8.0.1: icmp_seq=2 ttl=64 time=32.522 ms
64 bytes from 10.8.0.1: icmp_seq=3 ttl=64 time=43.121 ms

--- 10.8.0.1 ping statistics ---
4 packets transmitted, 4 packets received, 0.0% packet loss
round-trip min/avg/max/stddev = 31.003/34.470/43.121/5.028 ms
✅ Success! If you see similar results, your VPN tunnel is active and you’re securely connected to your WireGuard VPN server.
Conclusion#
By following this guide, you’ve successfully built a secure and private VPN environment using WireGuard and DNSCrypt-Proxy. This setup not only encrypts your internet traffic but also ensures your DNS requests are protected through DNS over HTTPS and customizable filtering, adding an extra layer of privacy and security.
With proper firewall rules in place, IP forwarding enabled, and NAT configured, your VPN server is now fully capable of routing traffic for connected clients while blocking unwanted domains and potentially harmful connections.
This solution is lightweight, fast, and highly configurable, making it ideal for personal use or small teams that value both security and control. Remember to:
- Regularly monitor your DNSCrypt logs.
- Keep your WireGuard keys secure.
- Periodically review your firewall settings and DNS blocklists.
If you ever need to scale, add more clients, or improve filtering, your foundation is solid and easy to expand.
Thank you for following along—enjoy your private and secure VPN!